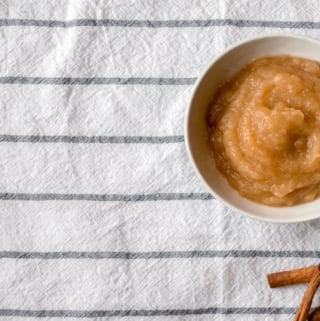
This homemade applesauce recipe is one that was developed after picking one too many apples at the orchard a few years ago. It's 3 simple ingredients, and a bit of time. Make this recipe in small batches for homemade applesauce all year long OR pick ALL the apples and make it once for the whole year.

"This post may contain affiliate links, which means I receive a small commission, at no extra cost to you, if you make a purchase using this link."
Why you should make this homemade applesauce now!
Apple season is upon us (it's almost fall in the Midwest right now) and if you are anything like me you are going to end up with a ton of apples in your home. And there are only so many apple pies and apple cakes to be made. (I personally can't stand pie 🤷♀️, so most of our apples get sauced).
After doing a little research, I realized that making homemade applesauce is really super easy and this is why you need to try this recipe ASAP! You just need a good knife (or one of these apple corers) for cutting all the apples up, a giant pot, some cinnamon if you choose and a bit of time. On top of that, you may want a high speed blender (are you surprised?), to puree it all up at the end, but it's not mandatory.
Ingredients

A few notes on the ingredients:
- Cinnamon: Spicing up your homemade applesauce is completely optional. We like it with some cinnamon, but you can definitely leave it out if you want.
Simple step by step instructions
Making homemade applesauce is really simple, like only a few steps and a little bit of time.
First, you'll want to cut up your apples. You can do this one of two ways. Either cut the apple into big chunks and discard the cores OR use this fancy gadget to peel and core them at the same time. I like to use the peel when I make homemade applesauce, so I will often just cut the apples up. If the kids are "helping" then using the apple corer/slicer just makes things a bit more fun!
Then, toss all the apples into a large pot, sprinkle the cinnamon (if using it) over the top, pour in a splash of water and cover. Turn your stove onto medium-high heat to get things going.
After about 15 minutes, turn the heat down to medium and cook the apples until they have released some liquid and are totally soft (fork tender).
Last, let cool a few minutes and transfer to a high speed blender and puree to your desired consistency. If you like chunky homemade applesauce, you can skip the blending and simple mash the cooked apples with fork.
Transfer the warm applesauce to jars and store in the fridge or proceed with the canning process if you so choose.
Frequently Asked Questions
Now, I'm going to tell you something that might not be super popular. Use whatever apples you like. I (and the applesauce connoisseurs I talked to), think that the following make for the best applesauce, but who am I to tell you what you like?
- Jonagold
- Honeycrisp
- Empire
- Sweet Tango
- Pink Lady
Most people recommend a softer apple because it breaks down a bit more easily when cooking, but if you are going to blend it, it doesn't matter too much. Additionally, some people like to use an apple that will stay really white. In our house, we are totally fine if our applesauce is brown.
Although, I once had a combination that turned pink and that was awesome!
Leave it out? Sure you can adjust this recipe totally to your taste. That's the beauty of homemade applesauce. I happen to think a dash of cinnamon the applesauce better, but it's not necessary.
In fact, you can use any spice blend that you like, but I would suggest sticking with warm spices like nutmeg, allspice, cloves, etc.
You can also mix pureed fruits or veggies in. Roasted beets are great for this and make a sweet and beautiful sauce. You could also use pears or berries of any sort. These combos not only add nutrition, but make a simple baby food for your little one. Check out this guide for other great pairings.
Nope. I do this because I make giant batches of applesauce at a time and then we use it all year long. I also like that the jars are then shelf stable and don't take up valuable fridge space. They technically would last up to a year I'm told, but ours never last that long 😂.
If you make a reasonable sized batch you can easily store these in sealed jars in the refrigerator for up to a month. Use your judgement. I've stored mine in the fridge for up to 6 weeks without a problem.
If you do use the water bath canning method here are a few great resources and tools to make the job simple.
▸The Ball Canning website
▸I like these jars and these too
▸A pot like this will be helpful and a canning kit helps avoid burnt fingers
One (or three) more simple tips
- Try to only fill the pot you are cooking the apples in about ¾ full. If you put too many apples in, its really hard to stir.
- Add water only as needed or you'll end up with a really runny sauce at the end
- Don't have a high speed blender? No problem. You can either just mash the cooked apples up with a fork or use another kitchen tool. Immersion blenders, food mills, and food processors will all work. Just go slowly so you get the texture you are looking for.
Looking for more recipes using fruit you picked yourself? Try these:
When you try this recipe and love it 😍 let me know by leaving a comment below or 5 ⭐ rating!
📖 Recipe
Simply the Best Homemade Applesauce
Ingredients
- 6 lbs apples any variety you like
- 2 Tablespoons cinnamon sugar
- 4 Tablespoons Water
Instructions
- Cut apples into 5-6 pieces each, throw away cores. (Or use the fun corer/slicer/peeler machine).
- Place all ingredients into a large stock pot and cover with a lid.
- Turn on heat to medium high and bring to a boil, stirring every 5-10 minutes to make sure everything is cooking evenly. After 15 minutes reduce heat to medium and continue cooking and stirring.
- Cook until apples are more than fork tender (a fork goes through them easily).
- If the applesauce seems "dry", feel free to add a bit more water 1 tablespoon at a time.
- Once the applesauce is cooked through, cool a few minutes and then carefully blend with any blender you like and put into jars.
- If doing water bath canning, proceed with those directions, if not, let cool on counter and then refrigerate.
Notes
- Don’t have a high speed blender? No problem. You can either just mash the cooked apples up with a fork or use another kitchen tool. Immersion blenders, food mills, and food processors will all work. Just go slowly so you get the texture you are looking for.
- For instructions on canning the applesauce to make it shelf stable, check out this website. I've used their instructions successfully for years.
- Your homemade applesauce is good in the fridge for up to a month (if it lasts that long).
Nutrition
Want more recipes like this delivered right to your inbox? Be sure to subscribe below and never miss a thing!


Leave a Reply