Making homemade dill pickles is super simple! With a just few easy to grow (or buy) ingredients and a little bit of time, you can have homemade pickles ready to enjoy all year long.

"This post may contain affiliate links, which means I receive a small commission, at no extra cost to you, if you make a purchase using this link."
Why this pickle recipe works!
Homemade dill pickles are super simple to make and just taste so much better than store bought. Why you ask? Because you can tailor the taste to what you and your family like.
Making pickles is a science, but not a perfect one. You can adjust the salt level, the spice level and even play with what you pickle. Once you learn this technique for home pickling, you can use your skills for a variety of vegetables.
What is pickling?
"Pickling is the process of preserving or extending the lifespan of food by either fermentation in brine or immersion in vinegar." We are going to use the brining method for making these dill pickles. The brine in in this pickle recipe is a solution of water and salt.
The salt acts as a preservative by encouraging the growth of a good bacteria and preventing the growth of the bad bacteria. Salt has been used for hundreds of years as a preservative for all types of foods and it works well.
Ingredients

- Cucumbers: Look for cucumbers that are smaller in size (4-5") and firm. If you are growing them yourself the National Pickler variety is easy to grow and the seeds are easy to find.
- Salt: I use Kosher Salt in this pickle recipe
- Dill: You can use either the flower heads or the green leafy part of the herb. Both will give you the flavor you want in your pickles. Growing dill is simple to do or you can easily find it in most grocery stores.
- Garlic: Use the cloves from a fresh head of garlic.
- Pickling Spices: I like to use the McCormick Pickling spice blend for ease.
How to make homemade pickles
To make things even simpler, here are step-by-step photos to help you every step of the way.

- First you mix up the brine. That's the water and salt.
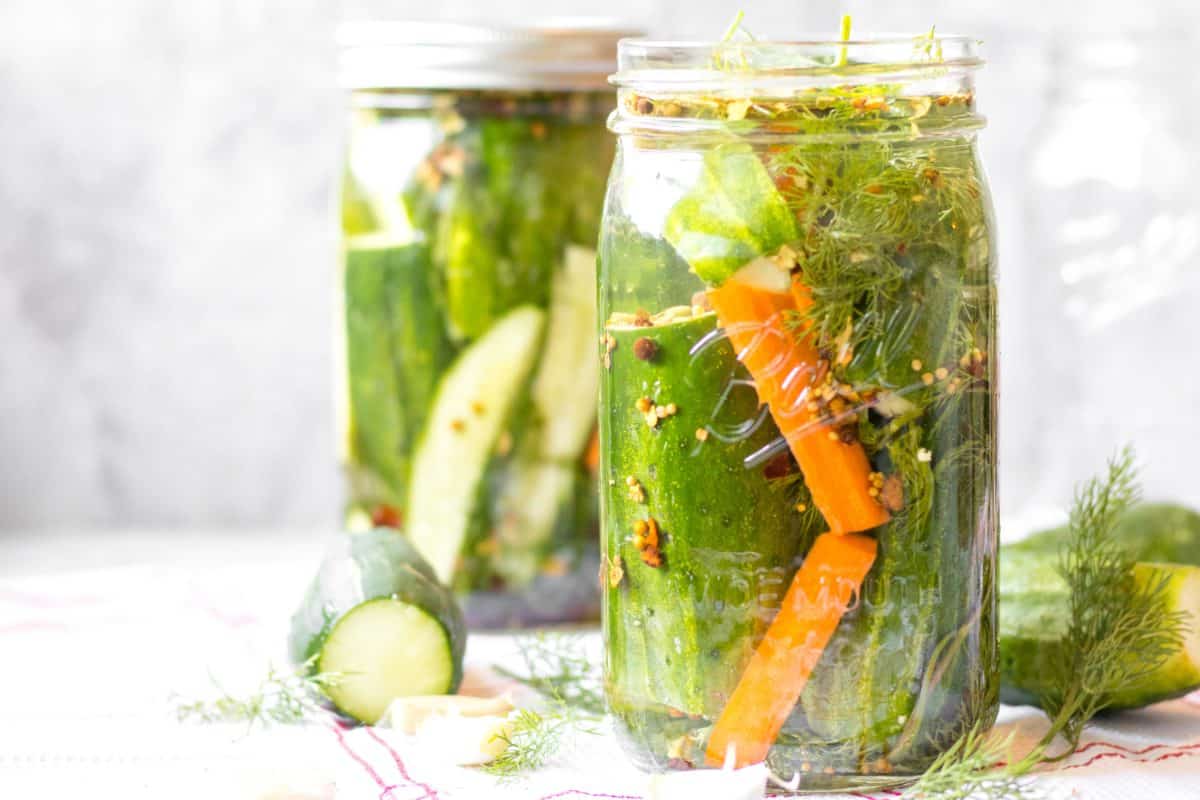
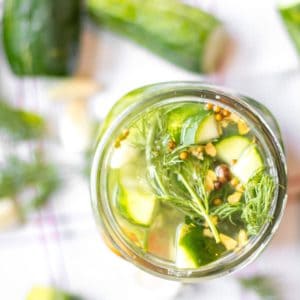
- Then stuff the cucumbers and all the spices tightly into the jar, and cover with the brine leaving about ½" space at the top.
- Put the lid on, put the band on and don't twist to tightly. You'll want room for the gases that build up to escape.
- Store in a cool place for 2 weeks, checking and loosening the lid every few days, as needed. After that, your homemade pickles are ready to go.
- Leave them on the shelf to keep pickling, or put in the fridge to stop the process.
For all measurements and a more detailed guide, check out the recipe card at the bottom of this page.
Frequently Asked Questions
While we are using the brining method with salt as a preservative (which means it is shelf stable) there is another way to make pickles as well.
That brine is a different solution that often uses vinegar and is ready to eat much more quickly. They are sometimes also referred to as quick pickles. Quick pickles are ready to eat in just a few hours after being made and must be stored in the fridge.
Once closed, the jars of pickles will last up to a year stored in a cool dry place.
Once opened, they will last in the refrigerator for a few weeks.
I like to use glass mason jars with a lid and band. You'll need clean jars and brand new lids. The new lids are important to make sure that you get a good seal on your pickles and that they don't spoil or spill once closed.
I like to use Ball Jar brand jars and lids. I re-use the jars every year, just run them through the dishwasher to sanitize before using them. Just just buy a new set of lids and bands when you are ready to make more pickles.
While you can use small mouth jars for pickling, however, wide mouth jars make it easier to fit all the ingredients in. The cucumbers must be packed in tightly and the small mouth jars can be a little bit tricky to fill.
How to store homemade pickles
We leave ours either on shelf in the basement but a garage that doesn't get below freezing or a cold storage cellar would work as well. Just as long as the storage space is cool-ish you should be good to go.
Once opened, you'll want to store them in the fridge. You can also put them in the refrigerator sooner to stop the pickling process.
Make a big batch of dill pickles
If you want to make a BIG batch of these, I would sanitize all of your jars at one time in the dishwasher, then line them all up next to each other and fill them assembly line style. This helps ensure you don't miss a step.
My parents work direct with a farmer from the farmers market each year to buy a bushel of small cucumbers. It's super cost efficient and nice to know where your cucumbers are coming from. Talk to you farmers, make connections and go for it!
A few tips to customize your pickles
- You can add in hot peppers if you want spicy kosher dill pickles. I would start with one and see what you think. Place it in the jar before adding the brine.
- If you like more garlic or more dill, go ahead and adjust to your taste. There is no wrong answer here.
- Adding in a carrot or two will help fill the jars if you can't squeeze more cucumbers in. Pickled carrots are delicious!
Looking for other recipes to that use seasonal produce? Check these out!
When you try this recipe and love it 😍 let me know by leaving a comment below or 5 ⭐ rating!
📖 Recipe
Simple Homemade Dill Pickles
Equipment
- 2 Mason Jars with new lids and bands
Ingredients
- 8-12 smallish pickling cucumbers
- 2 tablespoons pickling spice from McCormick or homemade pickling spice blend (see below)
- 4-6 garlic cloves halved
- 1 bunch of dill at least two stalks per jar
- ⅓ cup kosher salt
- 1 quart of water
- 1 carrot cut into small sticks optional
Instructions
Prepping the ingredients
- Sanitize jars in the dishwasher on in a pot filled with boiling water.
- Make the brine by adding salt to the water and stirring well.
- Wash and dry the cucumbers. Cut off the very ends of every cucumber. You can then either leave them whole or cut into spears.
- Prepare garlic cloves by peeling and slicing them in them in half.
Filling the Jars
- Start by placing a few springs of dill and 2 cloves of garlic at the bottom of the jar. Then pack the clean cucumbers into the jars. We typically get 3-4 whole cucumbers into each jar, more if you slice them into spears.
- If adding carrots, stuff a 2-3 carrot sticks into the jar. (this is optional)
- Add the pickling spices, shaking the jar a bit to be sure they don't just sit at the top. Pack a few more sprigs of dill on top.
- Cover with the brine leaving about 1" space at the top of the jar. Place on lid and then band and secure, but do not tighten.
- Put finished jars in a cool place to rest.
Checking on the Pickles
- Every 3-4 days you'll want to "burp" the homemade pickles. To burp them, loosen the lid to let the gases out and reseal. After doing this 2-3 times in a two week period, seal the jars and let them enjoy their time on the shelf.
- The pickles are ready to eat after two weeks, but can last up to a year if stored in cool place.
Notes
- 1 dried bay leaf broken in half
- 2 whole allspice seeds
- 10 whole coriander seeds
Nutrition
Want more recipes like this delivered right to your inbox? Be sure to subscribe below and never miss a thing!

Marni Katz says
These are our "house pickle" and we love them!
Matt - Total Feasts says
I have to say, one of the main reasons I started growing dill was because I LOVE dill pickles. They are a lot more popular in North America and Germany/Easter Europe than England, and I can’t figure out why! Thanks for the helpful tips!
simplegraytshirt says
We've always grown dill for this exact same reason. I'm glad you found this post helpful!